Friday, June 15, 2012
Almost Gourmet Chocolate Chip Cookies
A while back I set out on a mission to find the best Chocolate Chip cookies. I was sick of using the recipe on the back of the chips package. They always turned out flat and weird. So I set about the internet to find a good recipe. It didn't take long to find a recipe that would fit the bill of being the best chocolate chip cookies ever. However the recipe wanted all sorts of funny things like cake and bread flour, bittersweet chocolate chips, and sea salt. So originally I went out to find said products and found no cake flour in the Commissary (military base grocery store for all you non-military people.) I already had the sea salt, but was that really needed? I did find bread flour along with bittersweet chocolate chips (but I don't like how the bittersweet chips taste so we scratched that on the second batch.) I must admit up until this recipe I had no idea there were other flours besides the regular "all purpose" kind. Who knew?!
I have made these quite a few times now and have amended the recipe to what is now the "Almost Gourmet Chocolate Chip Cookie." I have to say thus far it is the best chocolate chip cookie I have ever had even over Mrs. Fields!
**Special note: This is a plan ahead dough as you want to leave at least 24 hours for the dough to sit in the refrigerator and "chill".
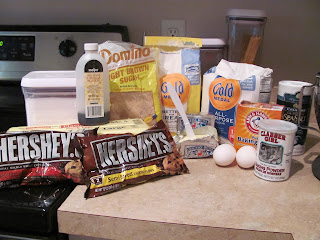
What you need:
2 Cups minus 2 Tablespoons All Purpose Flour
1 2/3 Cups Bread Flour
1 1/4 tsp. Baking Soda
1 1/2 tsp. baking powder
1 1/2 tsp. Salt
2 1/2 Sticks of Butter unsalted (1 1/4 cups, softened)
1 1/4 Cups Light Brown Sugar
1 Cup plus 2 Tablespoons Granulated Sugar
2 Large Eggs
2 tsp. Vanilla Extract
1 Bag of Semi Sweet Chocolate Chips
1 Bag Dark Chocolate Chips
Flour sifter
Kitchen scale (if you don't have one you can wing it)
Parchment Paper
Start by adding the following together: Bread Flour, All Purpose Flour, Baking Soda, Baking Powder and Salt. Once you have added this together sift these ingredients with the sifter. Set this aside.
In your mixing bowl add your softened butter, Brown Sugar, and Granulated Sugar. Mix until smooth. Add Eggs one at a time and mix in well. Add Vanilla Extract. Once all your wet ingredients are mixed together well you can start adding the dry ingredients. Slowly add the flour mixture letting the flour mix in well before adding more. Your mixer will be working hard by the time you get to the end of the flour mixture. But it should be able to get through the thickness.
Once you have the dough nicely mixed take the bowl away from the mixer and add both packages of chocolate chips. Stir in by hand with a spatula. I love the blend of the Semi Sweet and Dark Chocolate Chips. They make the cookie sweet but not too sweet!
Once you have everything mixed together place a piece of plastic wrap over the dough. Make sure you push the wrap down onto the dough and not just over the bowl or the dough could dry out.
Now the secret to making these cookies bake up well! Put the dough in the refrigerator for at least 24 hours. The dough will stay and can be used for up to 72 hours after making it. I have found this step is key to having your cookies come out plump and gewy in the middle.
24 hours later pre heat your oven to 350 degrees, break out the dough from the fridge and start rolling balls. This cookie needs to be hand rolled into balls that weigh about 3 1/2 ounces or about the size between a golf ball and a small baseball. A good way to measure if you don't have a scale is it fits well in the palm of your hand.
Once you have the perfect ball place it on a Parchment Paper lined baking sheet. You should get about 6 cookies each baking sheet. With your oven at 350 degrees, place your pan on the middle rack and bake for 18 to 22 minutes. I look for a nice golden color on the tops of the cookies to know they are done. That gives them the nice gewy center but a lightly crisp shell. They can be a little too gewy and not quite done if you don't let them get just ever so golden.
Once they are out of the oven you can serve after cooling for a few minutes. They are quite honestly the BEST right out of the oven. When I made them the last time I took some wax paper and wrapped them like a sandwich and used to masking tape to secure them. Put them on a tray and brought them to our Community Group. I feel a little gourmet with these cookies because they are so big and delicious that they remind me of a cookie I would get from a specialty shop. Best part is I made them in my own kitchen!
Enjoy!
** Note: The base for this recipe before I tweaked it was taken from the Tidy Mom Blog.
Subscribe to:
Comments (Atom)


